Third Rotation: Research Division

The Research division works to create open-source tools and software to assist historians in researching and presenting their own findings, as well as engaging with the scholarship of others. During our four-week rotation in this division, we learned about and experimented with PressForward, primarily through working with DH Now, and RRCNHM’s newest tool, Tropy.

First, we took a closer look at Digital Humanities Now, a website that acts as a distribution platform for digital humanities based scholarly work in various formats from blog posts to white papers, as well as conference and job announcements from the field. Coming into the Research Division, we were somewhat familiar with DH Now as we had been using it all semester to stay current on what was happening in the DH field. However, I was less clear on the actual underpinning of how DH Now worked. I knew that multiple feeds were brought into the WordPress site and from there, DH Now staff and GRAs curated those feeds, choosing what to publish on the website.

In fact, as we learned, DH Now is powered by PressForward, a WordPress plugin created by the Research Division at RRCHNM that allows one to easily aggregate and share content from the web. DH Now is only one of multiple websites that use the plugin to aggregate and share scholarly web content.

We then were tasked with using our new knowledge of PressForward and DH Now to serve as the Editors-in-Chief for a week, reading through nominated content, choosing what would be the best material to publish, and even selecting the Editor’s Choice piece. Through this hands-on experience, we were able to get a sense of how DH Now worked from the editors’ perspective, instead of from more of a consumer’s view.

Finally, we worked with Laura Crossley, one of the Editors-in-Chief of DH Now, to install and use the PressForward plugin on our own scholarly websites. Laura uses PressForward, much like DH Now, to aggregate DH content on her own blog and share her own comments about what is happening in the field. After considering several options, I decided to use PressForward on my personal website in a less extensive, but still quite useful way. Up until this semester, my personal website has contained blog post updates about my coursework and progress through the Graduate Certificate in Digital Public Humanities. Now I have also begun publishing these posts on the RRCHNM Fellows Blog. It is likely that in the near future, I will also publish blog posts or other scholarly web content in places other than my personal website. Therefore, I am excited to be using PressForward on my own website to bring together a collection of my work in one location. This will allow me to do a better job of keeping track of my own work, while also offering a place for others to examine the various ways I have engaged in the scholarly conversation.

Secondly, we spent time experimenting with and learning about Tropy, the newest research tool built by RRCHNM. Tropy had been released just prior to the beginning of our rotation in the Research Division, so we were some of the first people outside of the Tropy team to really get to see what Tropy can do. Like many of the projects carried out in the Research Division that try to solve a current problem troubling historians, Tropy gives a solution for what to do with the thousands of pictures that scholars take during trips to the archives. We were challenged to experiment with Tropy by reading the documentation, downloading the software, importing some of our own research materials and finally, creating a metadata template for that material.

As a historian of Early America, dealing mostly with handwritten documents, I found that Tropy is extremely useful. It allows you to easily import images and group them into documents, which is helpful if you have a multi-page document and a separate image for each page. Next, there is special split screen view (document on top, space to type underneath), which allows you to transcribe the documents right in Tropy. Before Tropy, I had been keeping my transcriptions (as Word documents) and image files (in a photo editor) separately, but Tropy allows you to save them together, which is really helpful. Tropy also has a search feature, so that you can find every occurrence of a certain person or place’s name in the documents you have transcribed, instead of manually reading through text files to find what you are looking for.

A big part of Tropy, and the second part of our task, was to deal with the metadata associated with our documents. Tropy comes preloaded with a basic template and a few more specific ones (ex. for correspondence or photos). The templates differ in the metadata that they ask you to add for each item. For example, the generic one asks for information like title, date, item type, source, holding collection, etc. while the correspondence template asks for the title, author, recipient, date, location, archive it is from, etc. The metadata properties have to come from an established vocabulary (ex. Dublin Core) but users can import other vocabularies available through Linked Open Vocabularies (LOV). Users can also download templates that others have made or upload templates they had made.

For my experiment in creating a Tropy template, I used material from a previous research project about a rape case in Fairfax County, Virginia during the Civil War. While my research had been supplemented by government and prison records held at the Library of Virginia and newspaper records at the Fairfax County Library, the core of my research centered around the case file for the trial, which is held at the Fairfax Circuit Court Historic Records Center, in Fairfax, VA.

Originally, I thought that I might make a template that could be used for all material at the Historic Records Center, as that would be helpful to a larger group of people if uploaded and shared. My thinking was that I could add the Historical Records Center as the Default Value for the Source property, and that way, users would not have to type that in for every item. But as I tried to create a generic template that would encapsulate all the types of sources held at the Historic Records Center (wills, deed books, birth, death and marriage records, road petitions, as well as court documents), my template ended up being no different than the “Tropy Generic” template that comes with the software.

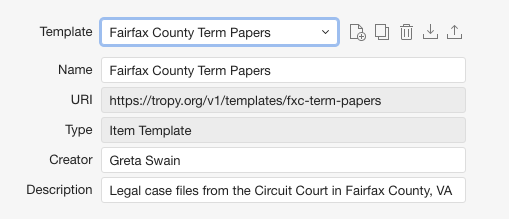
So I decided to take a different approach and focus on making a template just for the Term Papers at the Historic Records Center. This class of documents provides the legal  judgments for each case, and includes any court papers filed during the term of court. As I knew from my research, item properties like “creator” were less important than determining things like the plaintiff, defendant, and case type (murder, debt, trespass, assault, etc.). After a long search through the properties and vocabularies that came with Tropy, I found that I could use the Dublin Core property “Subject” to stand in for the case type, but that there were no good properties already in Tropy to describe the Plaintiff and Defendant. Therefore, I used Linked Open Vocabularies to find a vocabulary through the Library of Congress (MARC Code List for Relators) that included these two properties. Next, I downloaded the vocabulary and imported it into Tropy, where I could add the two properties to my template. Here is a sample of my template:

Swain FXC Term Papers 1Swain FXC Term Papers 2

Overall, I enjoyed my time in the Research Division. It was really interesting to see how the team in this division had identified two problems common to the historical profession–namely, how to get more publicity/recognition for scholarly grey material and how to organize images of documents from archival research–and how they worked to create usable solutions to these problems. I also appreciated the chance to see how these tools could be incorporated into my own scholarly work and blog.

Second Rotation: Public Projects Division

The Public Projects Division creates tools, projects and collections that encourage greater interaction with history among a popular audience. Some of the division’s projects are geared directly for public engagement while other tools help public history professionals more easily create collections, exhibits and projects of their own. During our four-week rotation in this division, we worked primarily on two projects, Omeka S and Mapping Early American Elections.

One of the most well-known and in-demand tools that RRCHNM has created, Omeka, comes out of the Public Projects Division. Omeka was released in 2008 as a web content publishing platform that would allow for the assembly, management, and exhibition of digital collections. Omeka S, the Public Project’s newest addition, builds on the popularity of Omeka Classic. Omeka S allows users to create and manage multiple Omeka sites on a single install. It also boasts new modules (plugins) for mapping and importing collections from other systems. Additionally, it allows users to share resources and collections among their multiple sites, and assign distinct privileges to different levels of users.

When we began our work with Omeka S, it was in its final phase of testing, but as of yesterday, Omeka S: 1.0 has officially been released. To start out, we worked with Megan Brett, the Omeka End User Outreach and Testing Coordinator. She taught us how to work with with GitHub and secure shell (SSH) via the command line to install themes and plugins on an Omeka install. Then we worked to simultaneously review the existing Omeka S documentation while testing the instructions on the dev site. We were asked to proofread, not only for spelling and grammar errors, but more importantly, for readability and usability. Did the directions make sense? Were there enough screenshots to help the user follow along with the text? Were the screenshots current? Did they display what a user would really see on his or her screen? Did the dev site respond in the ways that the documentation suggested that it should?

This process of reading and testing gave me firsthand experience with using Omeka S and provided me a more profound sense of the tool’s capabilities. It has enabled me to confidently describe Omeka S to others and explain how it differs from Omeka Classic. Finally, it has encouraged me to explore how I can use the new features of Omeka S in my own work.

During the second half of our rotation, we worked on the Mapping Early American Elections projects. As an Early Americanist, I was excited to work on a project in my favorite era. Although I normally focus on women, gender and social history in this period, looking at the early elections was really fascinating. At the time we (briefly) joined the project, the project team had already created a data set based on the information collected in A New Nation Votes (NNV). They were in the process of creating maps from that data set to represent each Congress in each state in order to help visualize the votes based on political parties.

In addition, they were adding brief interpretive text to each map to explain how each state’s election system worked and to call attention to any interesting aspects of the elections or trends from the previous election. To get a taste of this work, we were asked to write the interpretive text for all the states during the first three Congressional elections. Writing this text required us to look at each visualization (map), compare it to the chart devised from the data set, compare it to the data tables, footnotes and research notes provided by NNV, and then complete additional research for some of the more complicated elections. After we finished writing our interpretive text, Dr. Lincoln Mullen taught us how to use markdown and GitHub to add some of our text to the dev site for the project.

As a student of history, I really enjoyed the historical inquiry and analysis associated with this assignment, as well as the larger questions that the work forced us to discuss and try to answer. First of all, it reminded me how much I like the investigative and interpretive work of history–trying to sort through many different pieces of evidence in order to form one’s best (informed) guess or interpretation of what happened in the past. The more I found out about each election, the more digging I wanted to do.

Secondly, the work forced me to ask bigger questions like, what does it mean to be elected? In our original instructions, we were asked to mention in the text how many candidates from each political party were elected. While this at first sounded straightforward, we soon found out that it proved more difficult. For example, what about elections where one candidate received the most votes, but then the election was contested, votes were later ruled invalid, and the results were officially modified? What if a candidate received the most votes but died before he could take office or he declined to serve? Is there a difference between who was elected and who served in Congress? These and similar questions were discussed during the project meetings before settling on a more precise definition for the project.

Most of all, this project showed how me how digital history projects can make an argument and contribute to the historiographical conversation. Dr. Rosemarie Zagarri, the Lead Historian on the project, writes in the project’s blog in a post called “What Did Democracy Look Like? Voting in Early America” that “Early American elections subvert conventional notions that portray the development of early American democracy as an orderly or systematic affair.” Doing the research required to write the interpretive text really drove home this argument. Early American elections were, in fact, really messy. After the Constitution was ratified, elections didn’t just automatically happen in an organized and efficient manner that was consistent from state to state. As Zagarri asserts, it was an era of experimentation.

By looking at the voting practices and results for several different states during the same election, it was easy to see how the election systems varied state by state. For example in the First Congress, Delaware’s election law required voters in each of the state’s three counties to submit names of two persons they wished to elect. Of these two persons, one was required to be an inhabitant of the voter’s own county and the other needed to be from a different country. The person who received the most votes overall (at-large) would win the election. In the First Congressional election in New York, on the other hand, the state was divided into six districts and voters in each district elected one candidate to represent their own district.

The experimentation of the era, even within an individual state, was also evident by looking at change over time in a single state during the first three Congresses. A great example of this is Pennsylvania. For the First Congress, Pennsylvania held an at-large election where voters were allowed to vote for eight different candidates who could reside anywhere in the state. For the Second Congress, Pennsylvania created eight districts, and only allowed voters to elect one candidate who had to reside within their own district. For the Third Congress, Pennsylvania’s number of congressional seats increased from eight to thirteen (following the results of the 1790 Census) and consequently, the state discontinued its use of the district system, and instead switched back to an at-large system like they had used for the first congressional election. Examples like these provide strong evidence that supports the project’s historiographical argument.

Overall, I enjoyed the mix of technical and more traditional (research and analysis) aspects of working in the Public Projects Division. Even though I am leaving this division, it will be interesting to track both of these projects as they progress; I will be curious to see how users respond to Omeka S in its first few weeks post-launch, and to discover what findings come out of the Mapping Early American Elections project.

First Rotation: Educational Projects Division

One of the first people I ever met at George Mason was Kelly Schrum, the Director of Educational Projects at the Roy Rosenzweig Center for History and New Media (RRCHNM). At the time, I was visiting George Mason as a potential school at which to pursue my Master’s degree in History. After meeting with Dr. Schrum, witnessing her enthusiasm for what she did, and hearing about the diversity of engaging projects being created not only in the Educational Projects Division, but across the entire Center, I thought, “I HAVE to be a part of this!” Three years later, I am excited to finally join the Center in my role as a Digital History Fellow.

Naturally, I was delighted to begin my journey at RRCHNM by spending my first four-week rotation in the Educational Projects Division. While I have had little formal training in classroom-based education (educational theory, lesson plan writing, etc.), I have always been passionate about history education and have held several jobs and internships executing museum-based history education. Also, my interest in using digital tools to help create resources for classroom teachers had been piqued while taking a class called “Teaching and Learning in the Digital Age” as part of George Mason University’s Digital Public Humanities Graduate Certificate (which, coincidentally, is partially administered by the Educational Division at RRCHNM.)  

While the Educational Division is somewhat separated from the rest of the Center by a hallway, it was clear right away that it is an integral part of what the Center does. There are multiple different projects that the division juggles at the same time, from creating education websites with partner organizations, to teaching and managing online courses in history and digital tools for classroom teachers and learners of all ages. The Educational Division keeps itself organized with a giant whiteboard, where progress is reviewed in a weekly staff meeting, and with To-Dos, messages and comments through project management software like Basecamp. Because of these organizational methods, it was easy for the DH Fellows to see the status of each project and know what needed to be done next. This allowed us to jump right in and start completing tasks that helped the division move forward on their projects. During what seemed like a short but productive four weeks, we focused on two main projects, Understanding Sacrifice and Eagle Eye Citizen.

Understanding Sacrifice is an ongoing program through the American Battlefield Monument Commission (ABMC) that allows teachers to research a fallen U.S. military hero buried in one of the ABMC cemeteries, write a short biography and eulogy for the fallen hero, travel to the cemetery where that hero is buried, give their eulogy at the hero’s grave, and then write a lesson plan for their students based on what they have learned through the process. This year, the teachers focused on fallen heroes from World War II in the Pacific. Therefore, the cemeteries they visited were in California, Hawaii and the Philippines. For this project, we worked directly with Jennifer Rosenfeld, the Associate Director of Educational Projects.

This project gave me experience doing a wide variety of tasks, as we worked to get this year’s lesson plans, source materials, educational resources, fallen hero profiles, and eulogy videos formatted correctly and uploaded online. Since this project uses a Drupal interface and required us to write basic HTML code, I was thankful for my previous internship at the Smithsonian Institution Archives, where I learned these skills.

Tasks for this project included transcribing audio interviews to be used in some of the teachers’ lesson plans, using YouTube to add closed captions to the eulogy videos and other content videos, inputting and uploading content to the ABMC Education website (images, hero profiles, lesson plans), double checking the sources for each lesson plan, and making sure sources were cited properly and linked to the correct websites. In addition, each online lesson plan also includes a printable PDF version of the lesson plan and applicable handouts. Once these PDFs were created by other GRAs in the division, we were tasked with proofreading them, not only for grammar, but also for content, formatting (spacing, bold, italics, font size, etc.), and consistency between what the teacher originally wrote, what had been added into the website, and what was in the printable PDF. Then we offered suggestions for improvement, which had to be sent back to the teacher for their response and approval before the necessary changes were made on the PDFs and on Drupal.

Out of all the tasks for the ABMC project, I most enjoyed adding the captions to the eulogy videos. First of all, it was a lot like video editing, with which I have previous experience  and which I enjoy. Secondly, it allowed me to learn a lot about the fallen heroes–their lives and the sacrifices that they made for our country. Because I know little about WWII in the Pacific, this was very insightful. Thirdly, through the videos of the teachers reading their eulogies at the fallen heroes’ gravesites, I could hear in their voices how much they felt for the the fallen heroes’ families and see how much hard work they had put into recognizing their hero’s sacrifice. This made me want to work even harder to do what I could, to make sure that the teachers’ work in honoring these heroes and teaching their students about them would be ready and available to others.

The second project we worked on is Eagle Eye Citizen. This website was developed by RRCHNM in partnership with the Library of Congress. It teaches civics to middle and high school students by allowing them to solve and create challenges in a game-like environment using primary sources provided by the Library of Congress. As the students solve and create challenges, they earn points, badges, and can even level-up. All the while, they are learning about topics such as voting, political parties, rights and civic responsibilities. The site also offers students a chance to reflect on each challenge at the end, telling how they solved the challenge or giving rationale for their selections when creating a challenge. For this project, we worked primarily with PhD candidate Sara Collini.

When we started our rotation, the site was mostly complete, leading up to soft-launch and then the official launch a few weeks later. Therefore, one of our primary jobs for this project was to “break” the site. We spent hours testing, making sure that all of the interactive elements worked, that students could not move on without completing each task, that the audio clips played, and that all of the links worked. One of the features of Eagle Eye is a “Look Closer” button, which gives students a larger view of each primary source. We checked if that was working. We also changed roles, logging in as a student and then as a teacher, checking to see if teachers could create and manage a class of student users, as well as review their students’ reflections and challenges they had created. We tested the site on different operating systems (Mac vs. PC) and browsers (Chrome, Firefox, Internet Explorer, Safari, etc.) to see how it might respond. Through doing this work, I realized how hard it is to describe with words what, where, why and how something is not working correctly. In the end, I eventually reverted to taking screenshots of issues and then annotating them with text, arrows and circles to point out the irregularities. Finally, at the end of the testing, we even had a chance to create challenges of our own that would be used when the site launches.

Although I only got to spend four weeks in the Education Division, I feel like I did and learned a LOT! Not only did I learn new content (information about ABMC heroes, how a lesson plan is formatted) and skills (how to create bulleted lists in HTML), I also learned about the workflow of a digital history center and how to balance working on different projects at the same time. While I had read a lot about how centers like RRCHNM function (both during the Certificate program and at the beginning of the semester), it has been really beneficial for me to see how the Center’s work is carried out on the ground, on a day-to-day basis, and to be a part of it.

It is also exciting to feel like the small role I played was actually useful for these projects, and that I was doing something that really mattered. Even as we move on to the next division, I am excited to see both of these projects launch and to hear what feedback the division gets from the teachers who are incorporating both projects in their classrooms.